


Mean Salamba means with support. Sir means the head…
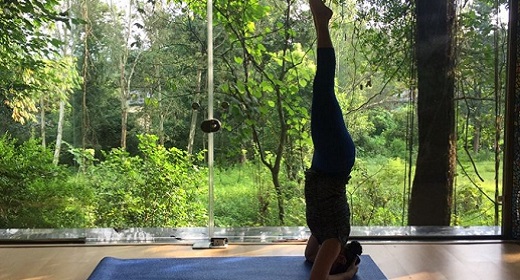
This is the head stand pose, one of the most important Yoga asanas in yoga teacher training in goa . It is the basic posture. It has several variations, which are described later as the Sirsasana cycle. Its mastery gives one balance and poise, both physically and mentally. The technique of doing it is given· at length in two parts; the first is for beginners, the second for those who can remain balanced in the pose. Attention is speedily directed to the hints on Sirsasana given after the two techniques.
HEADSTAND TECHNIQUE FOR BEGINNERS
- Spread the blanket fourfold on the floor and kneel near it.
- Rest the forearms on the centre of the blanket. While doing so take care that the distance between the elbows on the floor is not wider than the shoulders.
- Interlock the fingers right up to the finger tips so that the palms form a cup. Place the sides of the palms near the little fingers on the blankets. While going up on to your head or balancing, the fingers should be kept tightly locked. If they are left loose the weight of the body falls on them and the arms ache. So remember to lock them well.
- Rest the crown of the head only on the blanket, so that the back of the head touches the palms which are cupped. Do not rest the forehead nor the back but only the crown of the head on the blanket. To do this move the knees towards the head.
- After securing the head position, raise the knees from the floor by moving the toes closer to the head.
- Exhale, take a gentle swing from the floor and lift the legs off the ground with bent knees. Take the swing in such a way that both feet leave the floor simultaneously, to come to position. When once this position is secured, follow the various stages of the leg movement step by step.
- Stretch the legs and stand on the head, keeping the whole body perpendicular to the floor. 8. After staying in the final position to capacity, from one to five minutes, flex the knees and slide down to the floor in the reverse order and raise head from the floor.
- A beginner must have the assistance of a friend or do the asana against a wall. While practising against a wall, the distance between it and the head should not be more than 2 or 3 inches. If the distance is greater, the spine will curve and the stomach will protrude. The weight of the body will be felt on the elbows and the position of the head may change. The face will appear to be flushed and the eyes either strained or puffed. It is, therefore, advisable for a beginner to do the head stand in a comer where two walls meet, placing the head some 2 to 3 inches from either wall.
- While doing the head stand against a wall or in a corner, the beginner should exhale, swing the legs up, support the hips against the side of the wall and move the feet up. In a corner, he can touch the heels to either side of the walls. He should then stretch the back vertically up, gradually le11ve the support of the wall and learn to master the balance. While coming down, he can rest the feet and hips against the wall, slide down and kneel, resting his knees on the floor. The movements of coming down and going up should be done with an exhalation For more you can join our yoga teacher training in rishikesh .
- The advantage which the beginner has of balancing in a comer is that his head and legs will be in the right angle formed by the walls, and he will be sure of his right position. This will not be the case if he balances against a straight wall. For while his balance is insecure he may sway from the wall, or his body may tilt or swing to the stronger side, while his legs may rest against the wall with a bend either at the waist or the hips. The beginner will not be in a position to know that he has tilted to one side, much less to correct it. In time he may learn to balance on the head, but by habit his body may still tilt or his head may not be straight. It is as hard to correct a 90 wrong pose in the head stand as 1t is to break a bad habit. Moreover this wrong posture may well lead to aches and pains in the head, neck, shoulders and back. But the two walls of a comer will help the beginner to keep the asana symmetrical.
- When once balance is secured, it is advisable to come down to the floor with the legs straight (that is, without bending the knees at all) and with a backward action of the hips. At first, it is not possible to go up and come down without bending the legs, but the correct method should be learnt. Once the beginner has confidence in the head stand, he will find it more beneficial to go up and down with the legs together and straight, without any jerks.
- It takes time for the beginner to become oriented to his surroundings while he is balancing on his head. Everything will seen at first to be completely unfamiliar. The directions and instructions will appear confusing and he will find it an effort to think clearly or to act logically. This is due to fear of a fall. The best way to overcome fear is to face with equanimity the situation of which one is afraid. Then one gets the correct perspective, and one si not frightened any more. To topple over while learning the head stand is not as terrible as we imagine. If one overbalances, one should remember to loosen the interlocked fingers, relax, go limp and flex the knees. Then one will just roll over and smile. If the fingers are not loosened they will take the jerk of the fall which will be painful. If we do not relax and go limp while falling we hit the floor with a hard bump. If we flex the knees, we are unlikely to graze them in the fall. After one has learnt to balance against a wall or in a comer, one should try the head stand in the middle of the room. There will be a few spills and one must learn the art of falling as indicated above. Learning to do Sirsasana in the middle of a room gives the beginner more confidence.
HEADSTAND TECHNIQUE FOR THOSE WHO CAN BALANCE RIGHT
1 Follow the technique described for beginners from positions 1 to 4
2 -After securing the head position, stretch the legs straight by raising the knees from the floor. Move the toes nearer to the head and try to press the heels to the floor, keeping the back erect.
- Stretch the dorsal or middle region of the spine and stay in this position for about 30 seconds while breathing evenly.
- Exhale, raise the heels and take the toes off the floor with a backward movement of the hips. Raise both legs simultaneously, keeping them poker stiff. Take a breath.
- Again with an exhalation move the legs up until they are parallel to the floor. This position is called
(Urdhva) = up, dand = a staff) Stay in this position for 10 seconds with normal breathing.
- Exhale, move the legs up as in Plate 95, and then pull them up to the vertical position. Stay in this pose from 1 to 5 minutes while breathing evenly.
- Come down gradually, observing the above technique in a reverse order. Rest the feet on the floor, bend the knees and raise the head from the floor or blanket.
- While coming down, it is advisable to stay in Urdhva Dandasana according to capacity up to one minute while breathing normally. In this position, the neck and trunk will not be perpendicular to the floor but will sway slightly backwards. The neck, shoulders and spine will be put to a very great strain and in the initial stages one cannot stay with the legs parallel to the floor for more than a few seconds. The stay will become longer as the neck, shoulders, abdomen and spine become stronger,