


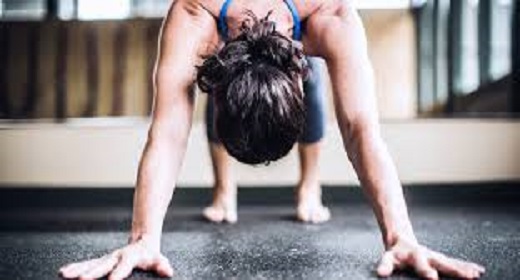
by Laura Necomer: More than 20 million people are down-dogging across the U.S. these days, pressing heels to mats in an attempt to reap yoga’s much-touted health benefits…
Among them: improved strength and flexibility, reduced tension, anxiety, and stress, and maybe even lower blood pressure . Research has also found that yoga can improve respiration, heart rate, and metabolism and help reduce pain . But this doesn’t mean that yoga, if performed incorrectly, can’t also cause harm.
Pain in the Asana — The Need-to-Know
While most yoga injuries aren’t severe and go unreported, more serious issues do occur, including strains and sprains, fractures, dislocations, and, in rare cases, bone spurs, sciatic nerve damage, and stroke . But according to yoga experts, injuries can happen any time, in any sport, or even walking down the sidewalk — and scary injuries are rare. Most yoga injuries develop gradually over years of consistent over-stretching and misalignment . As with any physical activity, the safest approach to yoga is to learn how to practice the poses correctly and stay in tune with your body to avoid overdoing it.
To get the lowdown on the most common yoga injuries and some specific tips for addressing them, Greatist spoke to yoga instructors Steven Cheng of Yoga Union in New York, Julie Skaarup of Sol Yogain Frederick, Maryland, and Jeni Livingston of Body Space Fitnessin New York. Read on for their injury RX — from head to toe.
- Wrists: When it comes to the wrists, it’s all about leverage. Placing all of the body’s weight in the wrists when the hands are on the mat can lead to muscle and joint injuries.Find relief: When in doubt, spread ‘em. In any pose where weight is placed on the hands (such as down dog), distribute the body’s weight through both hands by spreading them wide and pressing through the fingers. In down dog, push the hips back to decrease the angle of the wrists to the floor. In arm balances, such as crow pose, look to see that the elbows are stacked directly over the wrists, Cheng says.
- Elbows: Joint pain in the elbows can result from bending them out to the sides in poses like chaturanga. While it may be easier to execute, lowering down with outward-pointing elbows can stress the joint and can also put undue stresses on the wrists.Tuck and lower: When bending the elbows in a pose (particularly plank or chaturanga), keep the elbows tucked alongside the ribs as you bend them, and make sure the elbows’ creases face forward, Cheng says. If this is difficult (yes, it’s a serious test of triceps strength!), begin with the knees on the floor. Remember, you can always work up to the unmodified version through regular practice.
- Shoulders: Beware the shrug. By raising the shoulders up toward the ears (like when moving into up dog), yogis stop using the supporting muscles in the arms, shoulders, and neck. Shrugging also compresses the shoulders, which can cause muscle injuries, Cheng says. Even worse: It’s easy to injure the shoulder girdle or rotator cuff (and even dislocate the joint) by over-extending or over-stretching.Let go: Be careful not to pull too hard on the shoulders in stretches, and always keep the shoulders held back and down away from the ears, yoga teacher and personal trainer Jeni Livingston says.
- Ribs: Twists are awesome for releasing tension, but if done improperly they can overextend or bruise the intercostal muscles (the muscles in between the ribs).Twist, don’t shout: Lengthen upwards through the spine before twisting. Imagine that someone has a string attached to the crown of your head and is very gently pulling you up toward the ceiling. Twist to the point of feeling a stretch but not past it, even if you’re flexible, Cheng says.
- Lower back: Lower back pain is the most frequently cited yoga injury, and teachers speculate that it’s likely the result of rounding through the spine in poses like forward folds and down dog. Rounding causes the spine to flex the opposite way that it’s supposed to, Livingston says, which can cause disc problems in addition to that achy feeling post-class.Soothe the spine: Before bending, imagine lengthening the spine up and away from the hips to avoid rounding. Still struggling to stay on the straight and narrow? Try bending the knees in poses like forward folds and down dog, Livingston says, since the culprit could be tight hamstrings. During seated forward folds, try sitting on a blanket or block to take pressure off the lower back.
- Hamstrings: Spend most days sitting in front of the computer, in class, or in the car? Guilty as charged. As a result, many of us have tight hamstrings, so it’s easy to pull or over-stretch them in poses like forward bends, Cheng says.Hamper pain: Down dog and lunges are great ways to stretch the hamstrings (just remember to go slowly and work at your own pace). If you have any kind of hamstring injury, try laying off poses that extend through the back of the body and legs until the injury heals.
- Hips: It’s easy to over-extend the hips’ range of motion in splits, warrior poses, and wide-legged forward folds, Cheng says, which might tear the muscles of the inner groin or inner thighs.Get hip (to proper form): A good rule of thumb is to make sure that the toes are pointed forward in any pose where the hips are squared off in the same direction (think: warrior I). Imagine there are headlights attached to the front of the hips and that you’re trying to keep the area straight ahead of you illuminated at all times.
- Knee: Knee issues can plague even experienced yogis well after class . A common culprit of pain is the cross-legged position, Livingston says. Flexibility carries from the hips first; if the hips are tight in the pose, the knees will be the first place to feel pain or tension.Prevent the pain: For those regularly bothered by knee pain, avoid sitting in cross-legged position or full lotus for long periods unless the hips are already very flexible, Livingston says. Placing a block or rolled-up blanket under the knees in cross-legged positions can also help reduce strain. Any time the knee is bent in a standing pose (such as warriors I and II), look to see that there’s a vertical line from the bent knee to the heel, Cheng says — this ensures that the body is bearing weight properly.
- Neck: Head and shoulder stands can be the worst culprits for neck pain and injury, says yoga teacher Julie Skaarup. Repeatedly and incorrectly placing pressure on the neck in poses such as shoulder stand and headstand can compress the neck and put pressure on the cervical vertebrae, resulting in joint issues and, in some cases, loss of neck flexion.Prop it up: Have chronic neck or shoulder issues? It might be best to avoid full inversions all together, Cheng says (or attempt them only with close supervision and using props that elevate the neck away from the floor). For those who already practice the pose without props, make sure the shoulder blades are drawn down and back so they’re safely supporting the body. Most importantly, never jerk the head once you’re up in the pose, Skaarup says, because it can destabilize the body, possibly causing a fall.
Turn “Ouch!” into Ommm — Your Action Plan
Proper alignment in poses is key, but it’s not the only factor in a safe yoga practice. To stay blissed out instead of stressed out over injury, follow the basic guidelines below.
- Leave ego outside. It can be tempting to rush into more advanced poses (how tough can handstands be, right?), but pushing our bodies before they’re ready is a recipe for injury. Yoga is “about finding where you are,” Skaarup says, “not trying to push to a place where your body may never be able to go.”
- Warm up. It’s an important part of any physical activity, and yoga is no exception. Basic stretches (like neck and shoulder rolls and gentle twists) help prepare the body for more challenging poses later on in a sequence, Cheng says. And remember to give the mind a chance to warm up to the practice: Take a few breaths to get centered at the beginning of class, or establish a pre-flow ritual (such as chanting some Oms) to get grounded.
- Ease in. No one would expect to run a marathon the first time they lace up their sneakers. Don’t expect to do a headstand or even get the heels to the floor in down dog the first time you hit the mat, Livingston says. Instead, opt for beginner-friendly classes that will develop the foundation for more advanced moves.
- Communicate. Get to know the teacher and be sure to share any pre-existing issues that might require modifications in certain poses, Cheng says. If you don’t know how to modify or use props, ask. And if a pose just isn’t working, don’t be embarrassed to simply… not do it. Instead, focus on the poses that provide benefit and release.
- Come out of postures slowly. This is particularly important if you’ve been holding a certain pose for several minutes, Skaarup says. A good rule of thumb is to work out of a pose as gradually as you moved into it.
- Use props and modifications. There’s no shame in not being ready to hold a pose completely on your own. If there’s tightness somewhere in the body, other parts of the body will have to accommodate it, Livingston says — which is why it’s so important not to push the body past what it’s able to do on a given day. Props and modifications allow the body to get a feel for a pose and gradually work up to its full variation without injury.
- Never lock your joints. Hyper-extension (locking) is a sure-fire way to wear out joints and cause injury down the road. Focus on engaging the muscles around the joints to gain stability, Cheng says.
- If you do get injured, take care. If you tweak, pull, or tear something during a yoga flow, don’t be afraid to step out of class early. Care for it like any other sports injury, and seek a professional’s opinion if the pain persists.
- Stay for savasana. It’s easy to head for the door as soon as the instructor calls for savasana (the final resting pose of a yoga flow), but sticking around is good for your health. Savasana allows the body’s nervous system to slow down and brings closure to the practice. Even just two or three minutes can have an effect, Cheng says.
- Above all: listen to your body. At all stages of yoga practice, stay mindful. Really listen to your body so you can be sensitive to any tightness or strain. Just because you did a particular pose one day, doesn’t mean your body will be able to do it the next. “In our yoga practice,” Skaarup says, “we are building a relationship with our bodies the same way we build them with other people: by listening.”